How to Pupate Hornworms into Moths

Sunday, November 23, 2014
Around here hornworms (Manduca sexta) have been hit or miss as far as a feeder favorite in the last couple years. I used to have a lot of success offering green (the original, natural color) hornworms that came with the dark mulberry diet, but since the blue-phase worms have become all the rage they are just not as popular with my chameleons. Why this switch in the market has occurred I'm not sure, perhaps people buy the blue worms (which gain their color via their diet) are prettier and thus are purchased more often. I wouldn't know, but at any rate, it seems like my chameleons are not thrilled with the taste of whatever the blue worms are being gut-loaded on. They will eat one or two but refuse more than that. 

So this poses a problem for a keeper like me who wants to provide a varied diet that includes hornworms (since I find them readily available locally.) What has happened, especially now that I only keep large chameleons, is that instead of feeding off the worms I will let them pupate and turn into moths, which are definitely a favorite! So in this entry I will explain how I pupate my hornworms, which may be useful for others who also want to grow out the worms into moths for the purpose of breeding your own feeders. 

I started off with a typical pod of hornworms, the turned-blue variety, and allow them to grow out with their food supply, feeding off a few of the smaller worms if I can. My pod contained 15 worms, and the cup will not come with enough food to grow out all 15 so I fed off as many as my chameleons and one gecko would take. You can see below that they started off at a size of an inch-inch and a half. 


After just a few days (about 5) you can see that the worms have grown substantially. The worms are now several inches long and are approaching their maximum size. 


One of the larger worms. In blue they really are beautiful! This aqua color is my favorite color, so it does sadden me that my chameleons aren't dying to eat them just on the basis of color alone!


When the worms have reached their maximum size you will notice that they will drop down to the floor of the container (remember that you keep the cups standing on their lid, with the food up at the top so the poop/frass can fall to the lid and be dumped out easily.) At that point you'll see them wander the bottom restlessly, start to dull in color, and lose all interest in food. That's when they're ready to pupate! 


You can see below that they are no longer that vibrant aqua-blue, they are starting to dull and yellow. Not all of the worms will survive and pupate into moths, some worms don't form their chrysalis properly and others never emerge from theirs, you just have to see.


Since they are ready I will take a plastic container with a fair amount of floor space (like this one below) and fill it up with 3-4" of moist soil. The worms will begin to bury themselves into the soil, a process which may take a few hours. But eventually they all find a corner or nook to call their own under the soil and begin the process of morphing. I will check the soil every couple days and spray it if it seems like it is drying out. I do usually try to keep them with a lid on because when they emerge they can make a huge mess (you'll see what I mean later) so the lid keeps in the humidity as well.


This is what they looked like in the following couple days as they buried themselves down into the soil and began to form their chrysalis. I dug them up for the sake of the photos. 3 of the wormes died during this process.


So fast-forward almost 3 weeks from they day they transformed, the first moth finally emerged! When they emerge they can sometimes excrete a yellowish liquid all over the place, so that's why I keep them in a container with a closed lid. They emerge with their wings folded and will take a while for them to unfold, so at this point they are the perfect size for chameleons like veileds or panthers that might be intimidated by their size once the full wingspan stretches out.


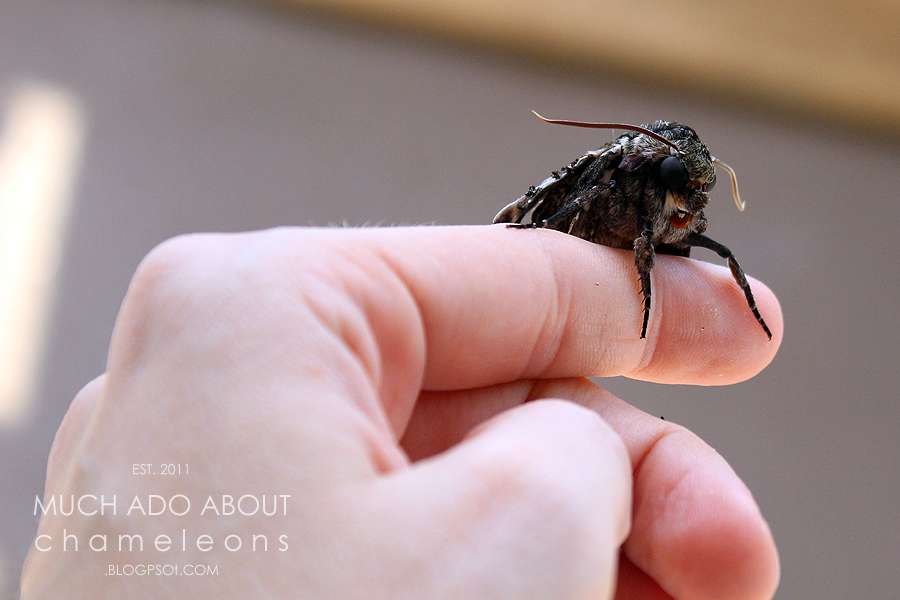
"Oh, what do we have here? Deliciousness?"
And that's it! With a few weeks of patience and really very few supplies it is really this easy to get hornworms to pupate into moths that you can then use as feeders or as breeders to make more hornworms. However, since I have never tried my hand at breeding them, you will have to search elsewhere for a tutorial on breeding them once you have a bunch of adults.

So do your chameleons love these moths as feeders too? Have you ever tried offering them? Let me know in the comments below!
7

Repticon Ft. Lauderdale November 15-16, 2014

Monday, November 17, 2014
Yesterday my family came with me to another Ft. Lauderdale Repticon show, and to my surprise even my mom seemed to have a good time. I got to stock up on insects and supplies, I was able to drop off two dead frozen chameleons to Dragon Backbone to articulate the skeletons for me (I'll post photos when I receive them in a few months!), and my mom even found a hat to buy. I had a great time like usual (although the show seemed dominated by bearded dragons this time!) and we had an incredible lunch afterwards just a couple streets over at Tarpon Bend (their black and blue burger- to die for!)


The last photo is my food pick-up for the next month or two - a box of 500 crickets, a box of 500 superworms, and a tub of 500 mealworms. With only two chameleons and a single gecko, my food bill has gone down considerably! The crickets will only last about a month but the worms I can get 2-3 months out of easily. Shout out to Georgia Crickets for being so nice, and always remembering who I am every time I stop at their table.

Who else went to this show? Did you also stock up on supplies or did you leave with a new pet (or two?) Let me know in the comments!
0

Greenhouses & Chicken Coops | My Fave Outdoor Caging Solutions

Sunday, November 9, 2014
Right now my life is experiencing a great deal of flux - I am waiting to hear back from grad schools in different cities (and indeed, states!) across the country, and with that comes packing up my things and preparing to begin a house hunt in whichever city I will be calling home for the next 2-3+ years. I have my fingers crossed that I will be staying somewhere in Florida, but time will tell. With all this change, I cannot make any concrete changes in my plans to set up a proper chameleon "facility" and move on with my plans to become a rescue & rehab, but I can at least begin to plan!

You may have seen a section in my Chameleon Record Binder that deals with brainstorming future plans. I will sometimes sit over coffee and doodle plans for a large outdoor set-up where I could keep several Meller's chameleons for breeding, and a second separate set-up for rescues that need rehabilitation. My plans change every time I think about it, since there are so many ways to do something like this! Sometimes I think a colony set-up (where all my healthy adults live together in a group and interact/breed together as they see fit) would be great, and other times I feel that individual housing is the best for everyone. Lately I have been leaning towards individual cages with separating panels that can slide out, expanding two cages into one large one, for example, so that I can combine groups of one male to 1-3+ females for breeding season and then isolate them again afterwards. 

I would also like to build what I call a "lobby" in my sketchbooks, that is, an enclosed area that acts as a second barrier of security on the front side of the set-up. Therefore, I would have to go through a door which takes me into a "common area" in front of all the cages, so that if I leave an individual's cage door unlocked they still cannot escape into the wild. With 2 locked doors between the animal and the world, I hope to keep everyone safer. 

Thanks to Pinterest I have been collecting lots of inspiration for future plans, and wanted to share them in a post for anyone else that is considering outdoor housing. 

Remember that when considering outdoor housing you have to keep in mind
1. Your temperatures (is it feasible to house animals outdoors most of the year?)
2. Your local wildlife (make sure your animals are safe from predators, including rats!)
3. The possibility of theft (how can you make it harder for someone to steal your animals? Think about locks for all doors.)
4. How to provide water and even heat for cold days. 

Below are my favorite inspiration photos found across the internet, most of them greenhouses and chicken coops:

Photo Source & Building Plans Here
I really like the above greenhouse because of the wall all around the bottom foot or so, which is a great way to keep out certain animals or at least make it harder, such as rats. Obviously everything that is glass/plexy would have to be metal mesh, but I like the design. One half of the roof could be solid for shade and the other half screen, to let in rain. 

Photo source Here
This is just a beautiful greenhouse. Solid walls like this with an open roof may make the whole thing too warm here in Florida, but for someone in a cooler climate this might be perfect. Then lots of plants and this would be heaven to sit in, coffee in hand, and watch the chameleons wander around.

Photo source Here
The above coop is very similar to the first one with similar ideas but simpler. This multiplied several times (each "unit" being a smaller size, say perhaps 5-6 square feet) would be a great set-up for multiple adult Meller's individually housed. 

Photo source Here
The above idea is a dog kennel but the idea still works for chameleons. Individually housed this works well for chameleons in a climate that can get cool in winter but not so cold to merit coming inside (like here in Miami.) You could have a smaller section at the end that is enclosed with just a small opening towards the top and inside have ceramic heat emitters to keep the temps more moderate for those cooler nights. With plexy windows the chameleons would not be intimidated to go into an otherwise dark, closed space. 

Photo Source Here
Photo Source Here
The above coop is my favorite project by far, I think they managed to make something useful and tremendously lovely for their chickens which I wish I could copy for my chameleons. Similar to the dog run above, it has an enclosed area at one end which I definitely think could have it's uses for chameleons. I also love the paneling on the sides and the brass lanterns. 

Photo Source Here
And one more coop with the raised bottom wall and which could be divided into individual cages, each with it's own door. 

So these are my latest inspiration photos, which I hope can give you ideas on how to build your own outdoor caging, even if it is only for a single chameleon. Sunshine is such a benefit to them that if you have the climate to provide natural sunshine at least a few hours every week during the warmer months they will be better for it. 

Do you have any ourdoor caging to share or that has inspired your own building plans? Feel free to share, I would love to see it! 
3
All material, unless otherwise cited, is copyright to Olimpia Martinotti. Powered by Blogger.

Search This Blog